Sunday, May 31, 2009

Ruh-roh! It's another Zumbo-fication!


I know, I know. If you read lots of Sydney food blogs you've already read something like this a million times. I don't blame you if you close the window right now! I wasn't even sure if I would bother posting about this, since all the other wonderful food bloggers have already done such a fabulous job reviewing Adriano Zumbo's new collection, 40 Days & Nights in Paris. But I feel compelled to gush about it, just a little. I had yet to experienced anything Zumbo-related until I joined a travelling party of bloggers (organised by the fantastic Reem, thank you so much!) to check out the new collection. All I can say is: I am converted.

Where's Zumbo?

We arrive at the cafe to find a ridiculous amount of desserts laid out just for us. Ohhh it's days like these that I want to give my little blog a hug! Thanks to Reem's organising with the lovely Rachael, they have very kindly given us free reign of the inside seating area of the small cafe and provided us with 4 of every dessert from the new collection for us to photograph, pick, purchase and polish off as we please.

Hello pretties!

I am pleased to realise I tried a lot of the things in the above photo! I was very nervous about what I would/wouldn't be able to eat because of my nut allergy, but I decided to be a little risky and try some things that may have had almond meal in them. I didn't have any sort of reaction at all, so either I was very lucky or I'm not really that allergic! Anyway I will spare you the gory details. Here is a quick summary.

What I got to taste:
I sampled the first three desserts shown below in the cafe. The first, '6/11/81', was mind-blowingly good. The combination of all those different flavours. It was intense but it worked so well. And OMG the crunchy coconut bits. The man knows what he's doing.

'6/11/81' - Milk passion caramel mousse, lime crème, passionfruit marshmallow, coconut crunch & brownie
The rice brulee tart was so pretty, it even tasted pretty. Perfect pastry with a smoky rice pudding interior balanced beautifully with the violet and zesty fruit.

'!'- Smoked rice brulée, violet curd, pate sable with mandarin & ruby grapefruit segments
People seemed scared of the olive oil dessert. I'm never scared of food, though I was a tiny bit apprehensive of the actual olive pieces, not being a huge fan of olives. I am a big fan of olive oil, and this dessert was like an olive oil party in my mouth. I found it intriguing and quite lovely.

'Z' - Olive oil biscuit, olive oil ganache, vanilla candied Kalamata olives, lemon & olive oil crème, vanilla lemon crème legere, jumbo gumbo jelly

The one I that had me at hello was the coke can. One look at it and you start to understand why he turns all the food bloggers into gushing groupies. I mean, look at it! I took this one home with me to enjoy privately hehe, though it barely survived the trip (see below). Yes I did try slurping up the gooey innards and made some very offense gloopy noises, the fizzy disc was really fizzy, and the whole thing was just sensational! I also purchased two others, though I only tasted the 'M' while A snuck off with the cheesecake in the middle of the night. The lemon curd and sable sand of the 'M' were lovely but I think the baked meringue was a touch too crunchy for me. I also enjoyed a mint hot chocolate while I was eating the goodies in the cafe. It was rich and thick, the right amount of sweetness with just a hint of mint.

'Escape from a Columbia Rainforest' - Flourless chocolate sponge, dark chocolate fizzy disc, cherry cola jelly, cherry cola slurp, chocolate sabayon mousse

‘M’ - Baked meringue, crème citron and sable sand

‘Ed Rock the Cradle’ - Milk coffee cheesecake with chocolate cheesecake base, coffee scented caramel crème and Italian meringue


Mint hot chocolate
What I wish I had tasted:
These two looked so yummy and they didn't seem to have nuts in them...and Belle looked like she was in heaven while consuming the 'S'!

‘S’-Tea and passionfruit soaked pears and savarin, lavender saffron mascarpone crème, crumble, raspberry jelly, coconut rehydration pipette

‘X' - Pine nut gianduja mousse, dark chocolate crème, pate feulletage caramelise, sacher sponge

Chocolate counter

What I definitely wasn't allowed to taste :(
Nuts nuts nuts...

‘.....’ - Hazelnut meringue, anzac moisture, mint chocolate disc, vanilla apple tatin chantilly, apple tatin compote, isomalt caramel

Also very nutty - 'P', 'V' & 'W'

Several bumps by some not so polite Balmainians on the trek home led to some chaos in my poor little Zumbo box :( I was almost too scared to open it to look when I got home. Noooooooo....

Carnage!

The desserts are all at a such a high level of gorgeousness that it is almost too painful to damage them by eating them. But you usually forget this initial hesistation once it gets to your tastebuds. So I've been Zumbo-fied and I will definitely be back for more. It was fantastic to meet or catch up with all the lovely bloggers (Reem, Trina, Anita, Lili, Simon, Karen, Belle, Susan, Chris and Tim) and a huge huge thank you to Adriano, Rachael and all the other staff at the cafe for spending the time and effort accommodating us and keeping us company! It was so sweet and truly awesome.

More carnage!

Adriano Zumbo Cafe Chocolate & Patisserie
Shop 5, 308 Darling Street Balmain

(02) 9555 1199

Monday-Friday: 8am to 4pm

Saturday: 8am-5pm

Sunday: 9am-5pm

and
296 Darling Street Balmain

(02) 9810 7318

Monday-Saturday: 8am to 6pm

Sunday: 8am-4pm
Print Friendly and PDF

Saturday, May 30, 2009

CWA Scones for National Scone Day!


EDIT: Go HERE to see a new, improved CWA recipe post!

I didn't mean to inundate this blog with consecutive scone-related posts. But it seems I am going to have to for today. I had other posts scheduled, but then yesterday morning a friend on the bus giggled and showed me an article in the local paper announcing that Saturday 30 May was apparently National Scone Day and the CWA in Eastwood would be celebrating by selling devonshire tea or coffee for $3. I will use any excuse to whip up a batch of scones, and what better excuse than a national day of scone celebration!

It only seemed appropriate that I try a CWA recipe for my scones today. I came across this CWA recipe (though I have no proof this is the real CWA recipe) and I have gotta say, these were the BEST scones I have ever made. The best. I have been trying a whole range of scone recipes from all over the place (which I haven't had a chance to blog about) but I am pretty certain I will be sticking to this recipe from now on.

There were a few worries. The mixture seemed too dry when I added the lower measurement of milk required, so I added the extra half a cup and although it was pretty sticky, it was easy to handle with floured hands. But after the suggested baking time of 12 minutes, I poked into one of the cuts I had made in the dough and it still looked raw and sticky. I had to turn the oven off and leave the scones in there for another 5 minutes. When I took them out after that they were perfection. Before I knew it, I had snarfed down two of them with some raspberry jam.

CWA Scones
(recipe from Epicure)

3 cups self-raising flour
1 tsp salt
1/2 cup cream
1 - 1 & 1/2 cups milk

Go HERE to see a new, improved CWA recipe post!

Sift dry ingredients. Cut in cream and milk with a knife. Work quickly into a dough on a floured bench.
Flatten into about a 1.5cm-high rectangle on a lightly floured or greased scone tray.

Cut into squares with knife or pizza cutter and place on top shelf of very hot oven (220-230 degreesC) for about 10-12 minutes.*

*Times and temperatures may vary according to your oven.
Fluffy fluffy scones!
Don't be scared off by the slightly moist and sticky dough that this recipe makes, as long as you cook it for long enough, these scones are the most wonderfully moist, crumbly and light scones you can make. The use of cream instead of butter gives it richness without it being at all greasy. And its so darn easy! Using a floured pizza cutter to cut the dough rather than making separate scones with a scone cutter seems to help the dough stay light. I barely worked the dough at all and it was very easy to pat out and cut.

The only type of scone I have yet to try is lemonade scones, but the ones I have eaten in the past seem too light and sweet. These are the scones for me. CWA ladies, I bow down to you. I will be enjoying more of these with raspberry jam and cream, Happy National Scone Day everyone!


Print Friendly and PDF

Wednesday, May 27, 2009

Mandarin & Ginger Cheesecake

What the hell was I thinking doing an upside-down cheesecake? There's absolutely nothing wrong with a right-way-around cheesecake. That is what I was thinking to myself as I was staring at this. The only motivation I had in the beginning was that I was too lazy to make a full size cheesecake and I wanted more biscuit in my cheesecake without having to stab my fork through a hard brick crust at the bottom of a pan.
I adapted this recipe from a plain mandarin cheesecake recipe. I've been dying to use ginger nut biscuits as a cheesecake base and I thought mandarin and ginger would make a nice combination. The actual cheesecake filling is wonderful and matches really well with the ginger nut biscuit case. I just don't think I'd make it upside down again haha. It did make it easier to get a good amount of biscuit with each mouthful of cheesecake, but boy was it messy to eat! I also tried to turn one out of its mould and that was okaayy, but definitely not as good-looking as it was in its cup. So while it was quite pretty to look at, it all seemed kind of pointless in the end!

Ginger & Mandarin Cheesecake
(adapted from Gordon Ramsay's Mandarin Cheesecake)
I'll describe all the components separately and you can choose how to construct it yourself :)

For the cheesecake:
300g mandarin segments (tinned or fresh, peeled and deseeded)
1 tbsp candied ginger, finely chopped
400g cream cheese
2 vanilla pods
100g icing sugar
1 orange, zest only
300ml heavy cream
Drain the mandarin segments and mix together with candied ginger. Set aside (or place at the bottom of your moulds).
Beat the cream cheese in a large bowl. Split the vanilla pods open, scrape out the seeds and mix them into the cream cheese. Sift in the icing sugar and grate in the orange zest. In a separate bowl, whisk the cream until you reach soft peaks, then fold it into the cream cheese mixture to combine.
Spread the mixture on top of the biscuit base (or in the individual moulds) and use a palette knife, or the back of a spoon, to level it out. Chill in the freezer for a minimum 5 minutes.* When ready to serve arrange the mandarin segments on top and carefully remove the cheesecake from the tin.
*Note: if you don’t wish to eat the cheesecake immediately you can allow the cream mixture to set in the fridge for half an hour rather than using the freezer.

For the crust:
175g ginger nut biscuits (store bought, or you can make them from scratch like I did)
Approx 1 tbsp melted butter
Lightly grease a 20cm/8" spring-form cake tin with butter if you are constructing a traditional single cheesecake. To make the base, place the biscuits into a food processor and blend to form fine crumbs. Add butter 1 tsp at a time and stir to combine. Take care when adding the butter, the ginger nut biscuits (especially the ones you bake yourself) do not need much butter before they become too oily. I only ended up using about 1/2 a tablespoon. Transfer the mixture into the cake tin (or individual moulds) and press over the tin base, to spread evenly. Place in the freezer for 5 minutes to set.
Whether you construct the normal cheesecake or decide to be a nutbag like me and do an upside down one in individual serves, this cake is really yummy. A has always insisted that mandarins are the most perfect cheesecake fruit. I think I've had enough mandarin cheesecakes to agree with him.

Print Friendly and PDF

Monday, May 25, 2009

Coconut, Oatmeal & Apricot Biscuits


I know what you're thinking. Her bloodstream must be 50% jam by now. Well yes, it probably is! But it's worth it if I get to eat these. I was sitting around on a lazy Sunday, when A mentioned we should go for a walk to his family's house. Perfect excuse to whip up some quick cookies to bring as a surprise gift! I was just dying to use my new favourite bottle of apricot jam for a dessert, so I googled around until I found a recipe that used some of the ingredients I had in mind.

The biscuits on their own are wonderfully crispy and crunchy from the oats and coconut, but they are even better with a piece of dark chocolate pressed into the top of them. And even better with some apricot jam sandwiched in between them! I got a little bit lazy halfway through the construction of these biscuits, and ended up serving the plain biscuits with the jam and the chocolate ones on their own, so that I ended up with double the number of biscuits to share around :)

Coconut, Oatmeal & Apricot Biscuits
(based on recipe from Best Recipes)
100 g butter
75 g caster sugar
75 g brown sugar
1 egg
100 g self-raising flour
50 g quick cooking oats
50 g desiccated coconut
50 g dark chocolate (I used Lindt 70% cocoa)
Apricot jam

Chop up chocolate roughly. Cream both sugars and butter together until the mixture is light and fluffy. Beat in the egg, then fold in the flour. Fold in the oats and coconut.

Drop teaspoonfuls of the mixture onto lined baking trays and leave approximately 5 cm between biscuits. Press a small chunk of chocolate into the middle of half the biscuits. Bake for approximately 10-15 minutes or until golden. Cool on wire rack.


When cookies are completely cool, take one plain biscuit and one chocolate-topped biscuit and sandwich together with some apricot jam. If you can't be bothered doing that, either eat them plain or smear the tops with apricot jam. Jam may soften the texture of the biscuits.


In my opinion they taste the best when they are fully constructed like the one below, because they are a little bit soggy when you just smear the jam on top. But the cookies are so adaptable, do what you like and I'm sure it will turn out great.

Oh and we didn't even end up walking to A's family house, so I got to keep these for myself :D
Print Friendly and PDF

Saturday, May 23, 2009

Jam Madness Pt 2: Jam Drops


As promised, another jam related recipe. I would definitely change a few things if I made these again, in my particular, the jam to biscuit ratio. Jam tarts were one of my favourite biscuits as a child and these reminded me of them in taste, but the proportions were a bit off. I've also developed a rather unhealthy obsession with apricot jam, to the point where I was sitting at my desk eating it like it was yoghurt the other day. Ughhh my stomach is aching at the memory of it, blech.

The ones I made also look a lot rounder and smaller than the ones pictured in the book, so if you plan to make these please flatten them more than I did! I would use this exact recipe to make jam tart biscuits, so that there is a lot more jam on each biscuit. The texture of the biscuit is lovely, very crumbly, but you definitely need the jam to give it some extra moisture.

Jam Drops
(from The Essential Baking Cookbook)
80g unsalted butter, softened
1/3 cup caster sugar
2 tbsp milk
1/2 tsp vanilla essense
1 cup self-raising flour
1/3 cup custard powder
1/3 cup raspberry jam (or apricot jam)

Preheat the oven to 180 degrees C. Line two baking trays with baking paper.
Cream the butter and sugar in a small bowl with an electric beater until light and fluffy. Add the milk and vanilla and beat until combined. Add the sifted flour and custard powder and mix to form a soft dough. Roll heaped teaspoons of the mixture into balls and place on the trays.


Make an indentation in each ball using the end of a wooden spoon Fill each hole with a little jam. Bake for 15 minutes, cool slightly on the trays, then transfer to a wire rack to cool.


Can you believe that I made another jam related recipe after this? Steph's officially jam mad.

Print Friendly and PDF

Thursday, May 21, 2009

Jam Madness Pt 1: Jam Roly Poly


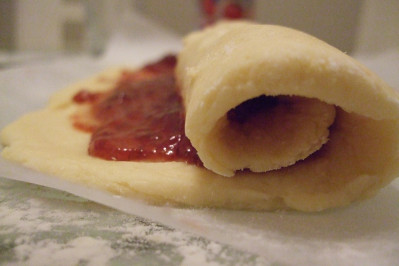
I am such a jam fiend. I am also a chilli fiend, chocolate fiend, ginger fiend, corn fiend, brie fiend, cinnamon fiend...oh heck, I guess I'm a food fiend. But my point is, I am going through a huge jam phase at the moment, which is probably related to that fact that I am also going through a huge scone phase. Any recipe with jam in it jumps out at me, like I have an internal jam radar. Most recently I spotted a jam roly poly and jam drops biscuits in the Essential Baking Cookbook. Both were so ridiculously easy and tasty that I will definitely be repeating them soon. In particular the buttery, golden jam roly poly. I just like the name roly poly.

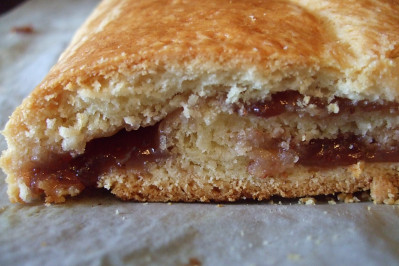
I woke up early and Saturday morning, itching to bake after spending the night flicking through that book. It sitting warm and gooey on the kitchen counter before anyone else had even woken up. It helps that there is no electric beater involved, so no loud noises to wake people up with :) The method for mixing up the dough was exactly like a scone recipe. As a result the rolypoly was a cross between a jam swiss roll and a buttery scone. Yuuuuuum.

Jam Roly Poly
(from The Essential Baking Cookbook)
2 cups (250 g) self-raising flour, sifted
125 g unsalted butter, chilled and cubed
2 tbsp caster sugar
50 ml milk
2/3 cup raspberry jam (I only had strawberry, any jam will do)
1 tbsp milk, extra

Preheat the oven to 180 degrees C and line a baking tray with baking paper. Sift the flour into a large bowl and rub in te butter with your fingertips until the mixture resembles fine breadcrumbs. Stir in the sugar and make a well in the centre.

Add the milk and 50ml of water to the well in the flour and mix with a flat bladed knife, using a cutting action, until the mixture comes together in beads. Turn out onto a lightly floured surface and gather together to form a smooth dough. Roll out the dough, on a large sheet of baking paper, into a rectangle measuring about 33 x 23 cm and 5 mm thick. Spread with the raspberry jam, leaving a 5 mm border all around.

Roll up the dough lengthways like a swiss roll and place on the tray seam-side-down. Brush with the extra milk and bake for about 35 minutes, or until golden and cooked through Leave for a few minutes before cutting into thick slices with a serrated knife. Serve warm (and with custard if you fancy it, I enjoyed it on its own).

Note: During cooking, the jam will ooze out slightly from the pastry, but this is fine.

It was wonderfully moist and crumbly straight out of the oven, and still delicious the next day warmed up in the microwave. Next time I think I will try this recipe with a recent favourite of mine, apricot jam :)


Stay tuned, jam drop biscuit recipe coming soon :)
Print Friendly and PDF