There's been a lot of interest in my old CWA scone recipe post, thanks to a Masterchef episode that aired recently where the contestants had to bake a few CWA recipes, including lamingtons, neopolitan cake, fruit cake, and the famous scones with jam. These are the awesome, fluffy scones that they sell at the Easter show, the one recipe I always turn to for plain scones. And let's be honest, the Masterchef contestants made a complete mess of it. It was a total disaster. And then everyone complained about the unfair conditions, the unfamiliar ovens and gusty winds and yadda yadda yadda...Yeah, whatever. Anyway, the episode made me look back at my original post and cringe. Ack, the awful photos taken at night! The messy, uneven scone cutting :( I felt like I had to do the recipe justice.
I was also fortunate enough to get a very lovely, helpful comment on that post from Yvonne, who shared the recipe she uses for CWA functions. It just required a bit of tweaking to the original ratios, but it is essentially the same. I used scone cutters this time, which meant they were much prettier and more uniform in size, so they didn't take a ridiculous long time to bake like last time. The high ratio of cream to flour meant that the scones were even softer and richer. They were so, so good. They had a very thin crust on the outside, and were uber soft and light in the middle. Not the least bit dry, and they smelt amazing! Even better than the previous recipe. Karen helped me wolf down these freshly baked scones with loads of strawberry jam. Those CWA ladies really are the scone masters, I bow down to you!
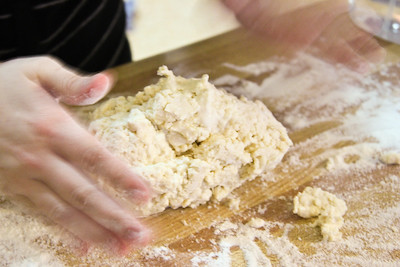
For me, one of the most important things when making a scone is how you handle the dough. The more you work the dough, the tougher it will be. I was nearly weeping when I watched Aaron knead his scone dough on that train-wreck of a Masterchef challenge. And surprise, surprise they turned out chewy. Please, please, don't knead your dough, pat it together gently! You'll get your best scones from the first rounds you cut out, and they will get tougher each time you have to re-gather and re-pat the dough to cut more rounds, so try to get as many as you can out of that first disk of dough.
CWA Scones
(recipe from Yvonne Dighton, see comments from previous CWA Scones attempt, makes 8-9 scones)
2 cups self-raising flour
1/4 tsp salt
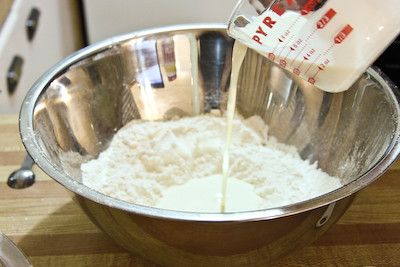
150 ml pouring cream (35% fat)
Approx 2/3 cup milk
Sift dry ingredients and preheat oven to 220-230 degrees C. Begin to cut cream into dry ingredients with a flat bladed knife, then gradually add milk until there is enough to form a soft dough. (I usually save a small amount of milk to brush the tops of the scones)
Working quickly and gently, gather dough together on a floured bench. Try to handle the dough as little as possible, using lightly floured hands to stop dough sticking to you, and pat the dough into a rectangle about 3-3.5cm thick. You can lightly knead the dough with your hands for a smoother appearance but overknead it and your scones will be tough and hard.
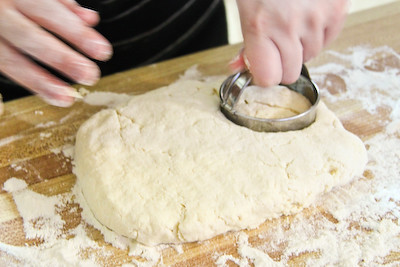
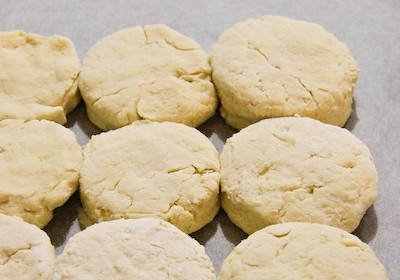
Cut out round using a 5-6cm scone cutter (push the cutter into the dough, don't twist) and place next to each other in a lined/greased heavy based baking dish that has sides (scones baked close together will rise higher and thus be lighter). I usually manage to cut about 5-6 scones, then I pat the scraps together and cut out another 2-3 and finally pat the scraps from that together into a ball to form the final scone. Lightly brush the tops of the scones with some extra milk using a pastry brush.
Bake for 10-15 mins, until scones are cooked through and tops are lightly browned. Serve immediately with jam and cream. (I like to cover my waiting scones with a clean tea towel to keep them from going hard) Scones can be stored in the freezer for up to 3 months.





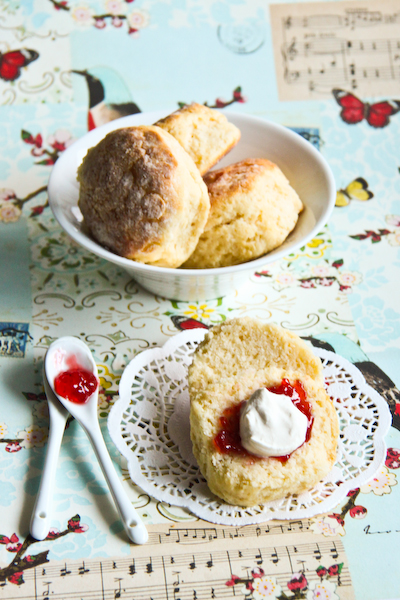

Scones make me feel warm and fluffy inside. Masterchef not so much
ReplyDeleteYou are a superior being and we bow down
lol @ ninja i agree *bows* to the master of all things baked
ReplyDeleteYay, I finally got to taste your famous scones! What an honour and thanks for making them! Seriously, these were better than all the scones I had in Sydney. I want some now :(
ReplyDeleteScone cravings rising... rising...
ReplyDeleteMmmm...haven't had scones in a while and actually have some cream in the fridge I could use... =D
ReplyDeleteAwesome work Steph! You are definitely the scone queen!! Love the background paper too - so pretty :D
ReplyDeletei'm drooling! those look super delicious! i haven't had scones in forever... i should give these a shot!
ReplyDeleteI can't believe at how easy these are to make!! I had a tough time with scones before but I need to try this!
ReplyDeleteWould you mind checking out my blog? :D http://ajscookingsecrets.blogspot.com/
YUM looks delicious - I have a serious scone addiction and shall be baking some this weekend me thinks!!
ReplyDeleteI can't wait to try this recipe out! They look amazing. In my normal cream scone recipe, the cream is whipped to soft peaks first. But that's too much effort haha.
ReplyDeleteMmmmmmm - I can't make a decent fluffy scone to save my life - they always end up like rock cakes. Gonna have to hand it to the CWA ladies, that recipe looks awesome. I will defo be giving that one a try ;0)
ReplyDeleteI got the itch too to make scones after this challenge. I am not sure the conditions of the MC challenge can be put totally to blame because Aaron had no idea of the technique.
ReplyDeleteYour scones look very good (better than mine :() What I did like doing was spreading some with cream and jam before putting them together like a sandwich and taking them to work. I could see workmates staring at them with envy as I munched them down.
The Ninja - Hehe whyy thank you ;)
ReplyDeletechocolatesuze - Err I wouldn't go that far..but okay! haha i kid.
Karen @ Citrus and Candy - :) So glad someone other than Aaron has tried them now! Aww you're too kind!
FFichiban - Give iiiin. DO IIIT!!
mademoiselle délicieuse - YAy do it!!
Betty @ The Hungry Girl - Aww thanks!! Must go back to Burnt Orange and get more paper!
Adriana - Thanks, they were quite tasty :) They're so easy, give it a go!
ajcabuang04 - Thanks. do you always plug your blog with every comment like that? it's a little rude.
cupcakexgirl - Scone addictions are the best addictions! Hope they turn out well!
Lisa - I can't wait to try your scone recipe! Scone swap!
Chele - It's all about the way you handle the dough! Gently and they will be super fluffy!
Mark @ Cafe Campana - Haha yeah Aaron was completely useless. Hhaha that sounds awesome, I have to do that next time!
Your presentation could not be more perfect! A scone is not really a scone without a doily, after all :)
ReplyDeleteSteph, your scones look great and this post and your post about scones at The Bakehouse, Berrima motivated me to visit Berrima and The Bakehouse this weekend. Alas, you will be said to hear that The Bakehouse is no more. The building is completely emply. There are times when I hate change.
ReplyDeleteConor - Aww thanks! Go the doilies :D
ReplyDeleteAnonymous - Oh no that's terrible! That place was brilliant. I'm sorry you went all the way there and were disappointed, hope you found somewhere else serving scones!
Hi Steph. Apart from the disappointment of The Bakehouse being closed I still love Berrima. We ate at a place called The Colonial something...Inn, maybe. More open and modern than The Bakehouse but still very nice. They have scones on their menu (though I didn't order them) - one scone plus tea/coffee $7.50. One of my favourite places at Berrima is The Little Handstirred Jam Shop. Their range of honeys is fantastic!
ReplyDeleteI use a recipe with similar proportions, but use lemonade instead of milk! The bubbles give a little more lightness to the scones, and just a hint of sweetness. The secret is to just not over-mix or knead - and cut with a sharp edge cutter. An old CWA recipe book also suggest to push cutter straight down- never twist it, as that also interrupts the rise.
ReplyDeleteAnna - I love Berrima too! totally agree, the jam shop is one of the must visit spots!
ReplyDeleteAnonymous - Ooh I've always wanted to try to make lemonade scones, will have to make them soon. I've heard the same tip, i will probably update the recipe with that tip, thanks!
I have a really hard time getting the dough out of the mound if I don't twist the cutter.. I pull the cutter out and it just stays in there and then I end up busting up either that one particular scone or all of the surrounding dough trying to get it out. Any hints?
ReplyDeleteAnonymous - If I understand what you said, the scone isn't sticking to the cutter when you pull it out? Perhaps your dough is a bit dry? I find my dough is so sticky that if i don't flour my cutter enough then the scones stick to the cutter and wont come out. Try adding more milk to your dough or if you think the dough is fine try dipping your cutter in milk before cutting?
ReplyDeleteYou are a goddess...thank you for this recipe. I don't have a scone cutter so just used a knife...they look a bit square-ish but boy oh boy do the taste gooood!
ReplyDeleteAnonymous - Thanks for the feedback, so glad you enjoyed them :) btw you can also try using a thin rimmed glass as an alternative to a scone cutter (I've used a wine glass before!)
ReplyDeleteI love scones so much, but I never made them myself. Now I will. Thank you!
ReplyDeletehello! Thank you for posting this recipe!
ReplyDeleteI've made scones before and they turned out ok so i was excited about trying a new recipe.
They turned out great! Thank you! I made some for my mum for mothers day and she was very impressed!
I didnt have a scone cutter and just used a glass, they came out fine.
Thanks heaps will be keeping an eye on your blog for other items now!
Thank you!
Missk8te
The best scone recipe in the whole world.
ReplyDeleteI have tried a million scone recipes and they've never really worked. This one was so easy to make and turned out perfectly, so light and fluffy. This is the only recipe for scones that I will use from now on. Thanks
ReplyDeleteYay! These comments cheer up my day :)
ReplyDeleteI tried this recipe on Friday night, and it was my first attempt at scones. They turned out AWESOMELY!! I served them with fresh strawberries and cream, and omg.... I can't stop thinking about them. Batch 2 is imminent!!
ReplyDeleteHey,
ReplyDeleteThanks for the info. I've never made scones before and what better place to start than someone who clearly knows what they are doing. Can't wait to try them. :D I had no idea about not over kneading so that's awesome to know.
One question though...I've heard fan forced ovens are bad but that's all I've got...any tips?
Thanks.
Thank you...my scones were flawless. It was harder to whip the cream for devonshire tea. Your info and tips were awesome and the scones a hit. :D
ReplyDeleteIceKat - So sorry I didn't manage to reply you first question before you made them! But super glad your scones turned out great :D As for fan-forced ovens, I use a non-fan oven at home but have also made the scones in fan-forced ovens with no issues. The main concern is ensuring the temperature is hot enough so that the scones cook through, and that the heat distribution in the oven is consistent enough that they cook through evenly. My non-fan oven is annoying as you have to flip between the top and bottom heating elements, so I usually have to turn the top element on right at the end to make sure it cooks evenly. I'm guessing fan-forced won't have that problem as much since the heat is more well-distributed!
ReplyDeleteMay I ask pouring cream = whipping cream?
ReplyDeleteLynn - Pouring cream is 35% milk fat cream, also called pure cream in Australian supermarkets: http://gourmettraveller.com.au/ExpertAdvice_200851_142.htm
ReplyDeleteI made this recipe and they did not rise, i didn't over work the dough, the oven was the right temperature and they were touching each other when I put them in the oven, I really wanted them to work and your ones are so perfect!
ReplyDeleteany suggestions as to why they were so underwhelming in the height department?
Lillian Louse - Was your self-raising flour fresh? That could be the reason, I always buy brand new baking powder/self-raising flour when I make a batch of scones. Otherwise you might want to try rolling your dough a bit thicker? Hope that helps!
ReplyDeleteHi,
ReplyDeleteRecipe looks great, I came looking for help after a failed attempt at scones from another recipe. Does opening the door disrupt them from rising? Also, you mentioned baking powder in your last comment - you only use that if you use plain flour, right?
Thanks!
Kylie - Opening the door will definitely disrupt it from rising. You want to keep your oven as hot as possible while the scones are in there. Yes, I only mentioned baking powder for those people making their own self-raising flour by combining plain flour and baking powder.
DeleteI love your scones. Love them. And I love the Internet. Because you're very, very far away, and I might previously have been unable to share your scone recipe. Which, did I mention, I love. So much, in fact, that after I figured out how to make it with American things from my American kitchen, I blogged about how awesome it is. http://knucklesalad.com/scones-again-naturally/
ReplyDeleteThank you for this recipe. Please thank the Country Women's Association for me, too, if you happen to have the chance. <3
My daughter first brought this recipe home from three-year-old kindergarten, that's how hard they are to make!!
ReplyDeleteWe have been making them ever since (1998) and they are always a hit with immediate and extended family alike. Once I accidentally even made them using a can of Pasito (yes I was rushing about and not paying attention - again).
Just made these yesterday, and they were the best scones I have ever made! So easy too. Thanks for sharing!
ReplyDeleteoh my god, these are the lightest, fluffiest pieces of heaven I have ever had. I am deeply in love.
ReplyDeletethank you! I am going to post them on my blog, I will refer back to here! ;-)
These scones really were spectacularly light and fluffy - with strawberry jam and whipped cream, amazing. I usually make an old womens weekly recipe with melted butter, but this recipe is my new favourite. Thank you!!
ReplyDeleteDo you have to eat them on the day, or are they good the next day?
ReplyDeleteHi Laura, they really are best straight out of the oven, but once they cool down you can store them in an air tight container in the fridge and warm them in the microwave the next day or so after that. Hope that helps!
DeleteHi, finally decided to make scones again after a failed attempt using lemonade. It was scrumptious!!!!! THANKS SO MUCH. Going to throw out all the other scone recipes I have gathered.
ReplyDeletehi steph, just wondering if these can be made in a mini version? just cut into smaller circles? would the timing and degrees on the oven be the same? i'm planning on making some for my best friend's 'kitchen tea'. thanks! and thanks for the inspiration! your creativity is AMAZING!!!!!!! i'm half chinese malaysian and i LOVE the pandan lamingtons! so cool!
ReplyDelete:) Emma.
I can't say for sure since I've never tried this but it should be okay! Keep the temp the same and shorten the baking time, just keep an eye on it since it won't take very long until the tops go golden. You might want to try a test batch to get the timing right!
Deletewhat position in the oven do we put the tray going to try these and where can we get a copy of the cwa cook book
ReplyDeleteCentre of your oven.
Delete